Monday, November 19, 2012

Pay it forward.

At the beginning of the year I did a "Pay it forward" status on Facebook where everyone who comments makes something for you and you make something for them. It would have been forgotten, but I decided to remind everyone and even got two new sign ups. They don't have to be useful things, just handmade.

Here is a frame I made. The paper didn't go on as smooth as I'd have liked, but it was my first time attempting something like this so, it's OK. It took a TON of glue to get the velcro to stay so it's not as sticky as it could be, but it still works. 


I was going to just do the snowman and have it just glued on, but then it would only be useful for one season. That is how I decided on the velcro.

Three other seasons. The candy corn was going to be a leaf, but worked out better this way. 

I have friends who's last name is Hawn. Many years ago when I first met them I was playing the SIMS a lot and I had a family named Hawnapple after them. Hence, this. Scrapbook paper, a wooden H, Mod Podge, and some painted wooden teardrop shapes glued into a heart. 

I have a friend who is a photographer and decided to make her some giant candy for photo props. They are foam and wood dowels, covered in Mod Podge to seal, and wrapped in plastic. 

Here is some of the candy. The top three are one piece, first picture in progress, second wrapped and ready, and third is showing a hole on the other side that I had no real way to fill. She will be able to hid that though. The BIG lollypop is different on each side and there are several other pieces that I don't have pictures of here. Another giant lollypop, bigger than that bottom lemon cream pie one, and some more candy pieces. 

This is made for a lady that I've never actually met who is the aunt of a girl I went to school with. She is one of the most awesome people I know and I hope she likes this. I don't have any really good pictures of it it seems, but it is a star shaped box that I took a pretty piece of scrapbook paper and Mod Podged it on. Then painted the side in a sort of Ombre finish.


Wednesday, October 31, 2012

Halloween!

Well I finished her peacock costume. She was adorable of course and more than one person told her that she was getting extra candy because she was just so cute. She got the hang of it very quickly, started knocking on doors and waiting, but if she felt they took too long, she'd walk away. She really wanted to just run around.

Here is the costume in progress: (You've seen the skirt and the onesie, but I'll put them all together as a reminder.)

The onesie I decided to use.

Close up of the skirt.

Supplies for the tights.

This is what it looks like right at the start, very foamy.

During the rinse cycle.

All done.
 Ta da! Front and back are basically the same.
So cute!

Golly gee I love her!

Knock knock! Ha ha!


Wednesday, October 24, 2012

Dirty Dishes

We live in a townhome that really isn't that great, hence we are breaking our lease and will be out in a week, but after all this time I finally figured out how to get our dishes clean in our 30 year old dishwasher.

In Maryland (at least here) you can't have the sprayer on your sink as the dishwasher back flows into the sink and overflows there if the sink is clogged (like ours was with tree roots a few months ago) so that the dirty water doesn't go back on the dishes.

No matter how much rinsing we'd do ahead of time, no matter how it was run, no matter that the sink was clean and the disposal run, the dishes would still come out dirty, or with this film of dust all over them.

Then I decided to clean out my disposal with baking soda and vinegar, then I ran the dishes, spotless.

I did it again, just to be sure, this time not rinsing the baking soda and vinegar down, just letting it sit until the dishwasher took over, even cleaner.

Regardless of what the code is here (I'm sure this isn't up to code anyway) the dirty water goes back onto the dishes. The only way to get clean ones (after 9 months of hit and miss) is by doing this first.

Sucks to "waste" that much baking soda and vinegar, but it's only a few more days, and at least I'll have clean dishes without a ton of extra work finally.

Monday, October 15, 2012

Cake Mix Cookies

I had a problem making cookies for fall the other day. I tried this recipe and it positively sucked. They were too sticky for anything, even with added flour and they really didn't taste that good. I followed the recipe exactly too, which is rare for me. So they just suck.

So instead, I made cake mix cookies! Most recipes use light mix, vanilla or whatever. We only keep chocolate in the house and so that is what I used. They are divine. I even had Chris take some to work. I made the first batch and they were so good I knew I'd need more, so I made more.


The smaller lighter ones are the first batch and they are Pillsbury Devil's Food. The darker ones are Betty Crocker Dark Chocolate Fudge.

I added pecans and chocolate chips to the Devils Food and Peanut Butter and Chocolate Chips to the Dark Chocolate Fudge.

I had one pan of fudge randomly burn, so ended up with less than I wanted. I say randomly because all the others in the oven at the same time were fine. 

Recipe is the same for both except the additions and I added bit of water in the Devil's food as it was too dry and crumbly to work at first.

1 tsp. baking powder
2 eggs
1/2 cup vegetable oil
1 box cake mix
Plus whatever you wanna add

Pumpkin Art

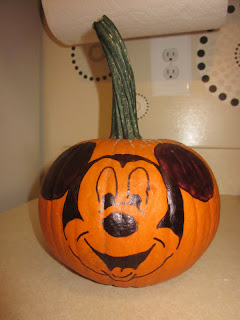
It took Mady forever to pick out the pumpkin she wanted. She kept pushing potential choices away saying, "no, no". She chose a small one that my husband didn't want to carve since its a pain in the butt, so today I took a sharpy and drew Mickey on for her. He turned out really well and I hope he stays. I only had a sharpy, as kids we used paint markers, but I don't have any right now.

My good sharpy started to run out so his ears are done with a generic one, which I'm less sure will stay once he is outside.

Art by Mady

I got this idea off pinterest of course. You put the paper, paint and whatever else inside a ziplock bag and tape it down on the table so the child can paint all day without making a mess and without it drying out.

Next time I will use a two gallon bag as it was hard to get the paper in, but then it was even harder to get it out. The paper is weakened by the paint and wants to rip and since it sticks I had to put my fingers on it to get it out.

All ready to go. I added doilies for interest. 

Taped down to her table as a surprise after her nap.
I showed her how to use keys and other things to make different lines.

All done hanging on the fridge. 

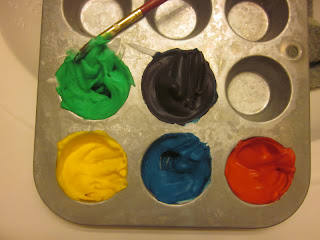
PS I think in an earlier post about bath paints I said I was going to try a different recipe? I did, and they were terrible. The first one, shaving cream and food coloring was great. The second one baby shampoo, corn starch and food coloring was no good. They didn't cover as well and they made the tub so slippery that she almost did a face first fall onto the edge of the tub. Never again.

They do have a consistency that is interesting floating in the water. That can be a tabletop science project later on.

Friday, October 5, 2012

Halloween Cards

I quick drew these out and I mean quick as Mady was trying to get them from me, and coloring over me and my pen was dying. Then Mady with orange and green crayons colored them for me. She didn't have a huge interest after she actually had permission, so they aren't as colored as I was hoping, but still cute.


We will send some to family and friends and probably one with an overseas care package.

Tie dyed Onesies

I needed to dye a onesie to go with Mady's peacock tutu for Halloween, but you get so much dye and I didn't want to waste it that I colored a few extras, some too small for her. 


Here is a solid navy blue one. I wish I'd done this in the teal, rather than the one that is too small for her.  I think I might add a "pearl" necklace to it.

One of the choices for the costume.

I think this is the one though cause of more teal.

These are all too small for her, but who knows maybe we will have another kid.

Close up of the tutu with the felt feathers.

Sunday, September 30, 2012

Shell Crosses

I made one of these before for a friend with shells I collected in Cancun, Mexico in 2008. Down south I noticed a lot of people with cross collections, no idea if that is the norm everywhere, but I made a few more with shells I collected when we went to Florida right before we moved north. 


Cross with a bit of variety. 

Cross with all the same type.

Cross with all white and splashes of purple.


If anyone is interested they are $7.00 plus $5.00 if they need to be shipped. 
They are equipped with a hanger on the back.

Christmas Keepsakes

As you might already know, we are military and were stationed in Gulfport, Mississippi when our daughter was born. We would take her for walks on base and I would collect seashells. Even though the base wasn't directly on the ocean, there were actually a lot of shells randomly all over. This is what I did with them. Christmas keepsake ornaments from the place my beautiful, life changing, amazing princess was born.

These are the four I have left. I'll sell them for $5.00 each if anyone wants one. If I need to ship it I'd add $2.00.

This was all of them. 
(Not my idea by the way I borrowed it from a museum gift store we went to.)

The back. 

Sunday, September 23, 2012

Fall wreath

Here is a wreath I made for fall. The whole thing cost me maybe $5.00 as I got everything except the D at the dollar store. I have made 2.5 wreaths now. I say 2.5 as the one for Christmas I just added bows and stuck a Santa head ornament in the middle. 


Here are the other 1.5.

See, just bows and a Santa head. He isn't even attached, just hangs on the hook with the wreath.

I lived in Mississippi when I made this Mardi Gras/Valentines wreath. I used beads that Chris and I got at a parade the year before. I spray painted the foam ring and stuck in hearts from the dollar store. We moved the week before Mardi Gras actually happened this year.


Random Learning Activity Crafts for Mady

Here are a few things I've made her over the last few weeks to learn new skills and to just have fun.

Bath tub paints made with shaving cream and food coloring. I made some more tonight with baby shampoo and corn starch. She hasn't used them yet, we will see which works better. Also she will have orange in her selection. 

She went for the red the most. She's always liked red since she was tiny. She might end up being a lefty.

I didn't have much and I bought the corn meal special for this. An indoor sandbox. She didn't use any of the toys and she ate a bunch of the oatmeal. Hey, it's one way to get it in her.

She threw all the toys out, rubbed cornmeal all over her legs, and dumped it on the floor and sat in the box.

Parmesan cheese container with pipe cleaners. (Sharp ends are folded in.) She LOVES this, plays with it all the time.

Box with holes to fit puff balls in. She hasn't been overly interested in this one. 

I made her a chalk board from a piece of cardboard. I wanted to use canvas but couldn't find the ones I have in the size I wanted. She was very excited and of course, like her crayons the chalk soon ended up on every other surface, but at least it just wipes off. 

Doll for Christmas

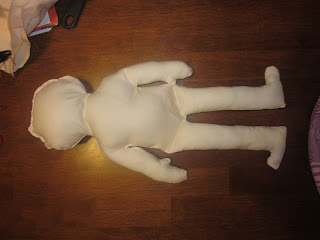
OK, the doll is basically done. She is just in need of clothes which I am trusting to my mother-in-law once I get her the measurements.

I messed up on her eyebrows a bit, but I decided that's the squinchy look Mady used to do when she was tiny. And her hair...oh her poor hair.

I got it at Joann Fabrics and it looked so pretty in the bag. It's bulk and you either glue it on or sew it on strand by strand. Rather a pain in the butt. I got curly as I just have always wanted curly hair and the only straight they had was blonde. I opted to sew it on as when you are playing with the dolls hair you want her head to be soft, not full of crunchy dry glue. There is only one thing. I noticed it and of course when I showed my husband he noticed it and used a much more vulgar term than I did...

It looks like pubic hair. There is no other way to say it...unless you are a vulgar sailor such as my husband. It's soft and fluffy, but it looks like it's in the wrong spot. I'm sure it will only get worse as Mady plays with it, oh well! At least she won't know the difference.

Here are some pictures so you can judge for yourself. Overall, I'm proud of the doll as she is the first of this kind that I've made, and only the third doll total. As I said before I messed up her armpit a bit, but that will be hidden with clothes.


Wednesday, August 29, 2012

Mady's Christmas Doll

She isn't much so far, but she is the biggest doll I've ever made, plus, only the third actual doll. So I'm pretty proud of her. I bought the fabric and the beans that are in her butt way back in January or February 2010 for my baby girl...and she wasn't even conceived until September 2010.

I messed up on her armpit a little, so it looks funky, but with clothes you'll never notice. She still needs said clothes, a face and hair. Have to decide what I want her to look like. I'm gonna make her little leather shoes to cover those funky feet.


Toddler activity and I spy quilts.

Some activity quilts that I hope to sell. The girl one I made second and so of course it is better and has more activities. Both are a step up from the first one I made. By the pictures I put if it was the boy or girl quilt, should be obvious, but you never know. Personally I think boys can have purple (it's in the rainbow) and girls shouldn't be all pink and purple, but a lot of mom's and dad's disagree. So, I did my best to humor the masses. 

I decided to do a giraffe for each one. If I'd have done a doll for the girl quilt I'd have had to make several different skin tones and an outfit. I have too much on my plate right now for that. 


Soft fuzzy sports ball fabric inside the lace and tie pocket. (boy quilt)

Stuffed toy in the learn to zipper pocket. (boy quilt)


Learn to snap and learn shapes on the left, learn to buckle on the right. (boy quilt)

That's a pocket the shapes can go in.

Lace and tie on the left. (boy quilt)

Learn to button and learn to count. (boy quilt)

I spy on the boy quilt.


Learn to button. (girl quilt)

Learn velcro, counting, and the colors of the rainbow. (girl quilt)

I spy. (girl quilt)

Full activity side. (girl quilt)

Learn to lace and tie. (girl quilt)

Every little girl will eventually need to know how to use a hook & eye.

Buckle (girl quilt)

Stuffed toy. (girl quilt)

She hangs out in the learn to zipper pocket. (girl quilt)

Learn to snap and learn shapes. (girl quilt)